When looking for server and network device monitoring, there are quite a few options, ranging from very expensive to free. Today I focus on a free solution that I use, The Hobbit Monitor.
Hobbit is a system based on a plug-in for the Big Brother Monitoring software. Big Brother has been around for quite some time and was bought by Quest Software a few years ago. Hobbit is very comparable the Big Brother system, keeping most of the same general interface and functionality but adding many new features and overall speed improvements.
Hobbit is a monitoring solution for servers and network devices and allows you to write or use extensions to monitor just about anything that responds over a network connection. A central server controls and collects the monitoring and displays the results via a fairly easy to use web interface. It will track history and trends (via rrd) and provides a built-in reporting tool. If there is an issue (that you've defined), such as a down host, the interface will turn red and will performs any alerting actions that you've defined, such as sending an email or sms message.
A member of the Hobbit team provides a live demo here: http://www.hswn.dk/hobbit/
The alerting function has some great features and is very customizable, but is less than straight forward in its setup. An example the configuration file:
$PHONE=MAIL mycell@acme.com SERVICE=conn REPEAT=2h FORMAT=sms DURATION>10m
$SYSADMIN=MAIL admin@acme.com REPEAT=2h DURATION>10m TIME=*:0600:2300
PAGE=servers/siteone TIME=*:0700:2100
MAIL a_sysadmin@acme.com SERVICE=conn REPEAT=50h FORMAT=plain
HOST=%^win.*
$PHONE
$SYSADMIN
Breaking it down a bit, the configuration is in two parts, the definition and rules of the targets and definitions of the monitoring rules.
The $PHONE definition will email mycell@acme.com only if the conn test (ping test) fails, will repeat the alert every two hours, send the alert in sms format. It will also only trigger if the system has been in alert status for more than ten minutes. The $SYSADMIN definition will email admin@acme.com every two hours on ANY failed test lasting over ten minutes and only between the hours of 6am and 11pm. Those two lines define the targets (whom to email) and the conditions at which to email those addresses.
The PAGE=servers/siteone definition will monitor all the hosts on a page on the server. If your server is http://hobbit.acme.com, then it will monitor all the hosts on http://hobbit.acme.com/servers/siteone. Continuing on that line, the section TIME=*:0700:2100 will only trigger the alert if a host is in alert status between the hours of 7am and 9pm. The next line specifies a target, in this case an email address with some extra rules. The HOST=%^win.* will monitor any hosts that has win. in the name. For example, if you name several servers inside Hobbit win.server, like win.mailserver, win.fileserver, win.appserver. No matter where in Hobbit you have these servers, they will be monitored under this rule. The next two lines, $PHONE and $SYSADMIN just call the predefined targets and use the rules defined there.
As you can see, the alerting functionality is very customizable and, even if the setup isn't point and click, not that hard to set up once you have a little understanding about it. Hobbit also features an easy way to pause or stop alerts via it's web interface. You can stop alerts by test type (like ping test, telnet test, etc), set a duration for the stopage (like no alerts for this host for the next two hours, or until the test turns ok), or even schedule a stopage when you are scheduling some downtime for a host.
As I mentioned before, Hobbit can be extended and customized for greater functionality. You can add more tests either by enabling those built in (refernce the help file for details), by writing your own port tests (also in the help), or by adding extensions. See deadcat.net for a lot of extensions and additional tests. Although the majority of these are geared towards Big Brother, with a little bit of code tweaking they can be easily adapted to Hobbit.
Although this system seems to be Linux/Unix oriented at a quick glance, it provides a lot of functionality for Windows systems utiliziing an agent called BBWin. With BBWin, you can monitor resources such as CPU usage, disk usage, memory usage, running processes and services, uptime, and netstat results. You can also add additional extensions (called externals in BBWin) to test for other things. Configuration is done in an XML file on each server and is very customizable.
You can customize the default warn and panic levels for the CPU usage:
Disk monitoring can be configured with a default warning and panic levels:
Or you can specify specific levels per drive based on a percentage or just an amout of space left:
Remote drives and optical drives can be monitored as well:
Services can be monitored wheter they are running or not. You can also automatically restart the service if you so configure it. You can specify any process running on the server just by adding another line with it's service name. Processes are configured similarily:
Example of the Hobbit overview of some Windows servers utilizing BBWin:
Example of the CPU usage monitoring: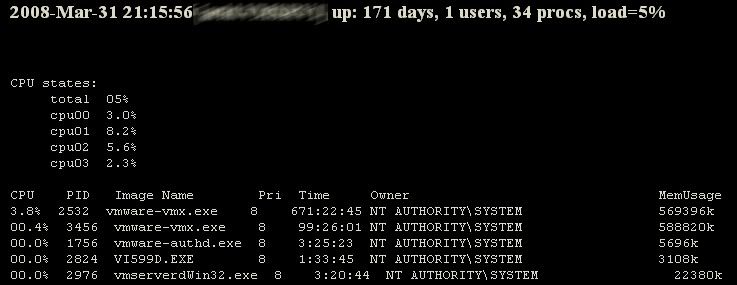
Example of the OpenManage extension I use for my Dell servers: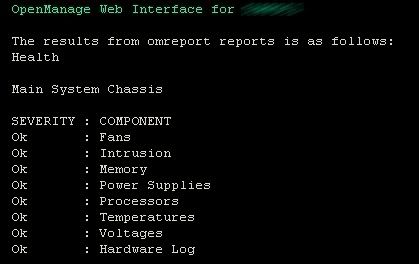
As you can see, Hobbit is a very powerful and customizable alternative to the other server and network monitoring products out there. With a little bit of reading and some work, you can get this system up and monitoring your systems without too much hassle. Hobbit is definately worth a try if you need a solution and don't have the funds to drop for a commercial solution.
March 31, 2008
March 16, 2008
So, a family member brought me a laptop from a small business owner who he helps with computer issues. Well, the laptop is broke. It looks like it'll boot into Windows (XP Home) and then blue screens. Safe mode does the same thing. Although the BIOS will see the disk, the Windows install media doesn't. And of course the laptop's owner really needs the company data off of it, can't afford data recovery, and, of course, has no backups.
We pulled the drive out of the laptop and used a IDE to USB converter to hook it up to my laptop. Windows recognizes the disk and assigns it a drive letter, but took forever (like 10 minutes) before it showed up in My Computer. Attempting to access the drive via My Computer, command prompt, or even by Run (e:\) would error out. So I figured the disk is in some way corrupt and a third party recovery software was needed.
I tried several recovery softwares, but the one that eventually worked was TestDisk. TestDisk is OpenSource freeware designed specifically for drives with lost partitions or recovering data from non-bootable drives.
From thier website, TestDisk can:
* Fix partition table, recover deleted partition
* Recover FAT32 boot sector from its backup
* Rebuild FAT12/FAT16/FAT32 boot sector
* Fix FAT tables
* Rebuild NTFS boot sector
* Recover NTFS boot sector from its backup
* Fix MFT using MFT mirror
* Locate ext2/ext3 Backup SuperBlock
It can also run under DOS, Windows, Linux, BSD, MacOS, and SunOS and can handle MANY different file systems.
For my issue in particular, I did the following:
1. Hook the drive up your computer. I used an IDE to USB adapter, but I'm sure setting the drive into slave mode and installing it into a PC will work as well.
2. Allow Windows to find the drive (I'm not sure if this is necessary since Windows XP found the drive for me. It may work without Windows recognition).
3. Open TestDisk (did I mention that no install is required?).
4. It asks to create a log file, I chose Create.
5. Select the drive and choose Proceed.
6. Choose the partition table type. Since this drive was running Windows, I chose Intel.
7. Here's the meat of the software. I chose Advanced.
8. Choose your partition you want to analyze. Some drives have more than one partition; even if there's only one presented to Windows, some manufacturers have a Diagnostic or Restore partition.
9. The next option I chose is List.
10. This should list the files on the drive. Select the drive by using the Up or Down arrows. Enter will bring you into a folder. The Left arrow will bring you up a level in the folder tree.
11. Select the file or folder you want to recover and hit the C key to copy. It will present you with an option to choose the directory on the local machine (the machine you're running TestDisk from) where you want to copy the file to. Hit Enter with your choice.
12. After the copy is complete, the text "Copy done!" will appear in green text. You can now choose another file or directory to copy or hit the Q key to quit.
Also be aware that if you copy a large amount of data it will be fairly SLOW. Or at least slower than most people's standards. But you will have your data, so a little time should be no big deal.
Seriously, add TestDisk to your Admin toolbox immediately.
March 15, 2008
Sorry for the lack of posting this month; building a 200 person call center from scratch has been dominating my time. It is almost done though, but I still need to find time to post.
Today we discuss a couple VMware issues.
"Operation Failed Since Another Task Is In Progress"
I've seen this error a couple of times. Basically what happens is that a VM will show running but is actually frozen. Any attempts to force a VM shutdown or restart results in the error "Operation Failed Since Another Task Is In Progress". Same if attempted to Vmotion the machine.
Basically this turns out to be a snapshot issue. To fix this without rebooting the ESX server, we can just kill the VM process via command line. I took this tip from a VMware Communities post and cleaned it up a little. The post can be found here.
1. SSH into the ESX server that is currently running the affected VM (or you can use the console).
2. At the cmd prompt enter: cat /proc/vmware/vm/*/names
This lists the running VM's on the host server you are logged on to. Look for the vmid=##
vmid=1069 pid=-1 cfgFile="/vmfs/volumes/45.../server1/server1.vmx"
uuid="50..." displayName="server1"
vmid=1107 pid=-1 cfgFile="/vmfs/volumes/45.../server2/server2.vmx"
uuid="50..." displayName="server2"
vmid=1149 pid=-1 cfgFile="/vmfs/volumes/45.../server3/server3.vmx"
uuid="50..." displayName="server3"
vmid=1156 pid=-1 cfgFile="/vmfs/volumes/45.../server4/server4.vmx"
uuid="50..." displayName="server4"
3. At the cmd prompt enter: less -S /proc/vmware/vm/1149/cpu/status
It will now clear the console screen and show a bunch of numbers and stats. Hit the right arrow key until you see the section about group. Example:
group
vm.1058
With this ID number you can safely kill the VM without corrupting it.
4. At the cmd prompt enter: /usr/lib/vmware/bin/vmkload_app -k 9 1058
(Then number 1058 in the command is an example; your VM's group number goes here.)
5. If you see "Warning: Apr 20 16:22:22.710: Sending signal '9' to world 1058." this means your VM has been closed successfully. You can now start your VM back up and run it.
Unable to migrate due to "Remote Backing" issues with CD/DVD
When trying to VMotion two VM machines, I received the error: "Unable to migrate from VMESX2 to VMESX1: Virtual machine is configured to use a device that prevents migration: Device 'CD/DVD Drive 1' is a connected device with a remote backing.". Going into Edit Settings didn't help; all CD/DVD options where greyed out. I had recently set both systems to use the client device and to disconnect.
I was able to fix one of them; the VMware Tools was still waiting to be installed. I right-clicked on the VM and choose "End VMware tools install". That did the trick and it VMotioned fine.
The other system didn't have that option. I ssh'd into the esx host and from the command prompt ran service mgmt-vmware restart
After about two minutes (including a scary "disconnected" state in Virtual Center that lasted about a minute), it allowed me once again mess with my CD/DVD settings and I was once again able to Vmotion.
More on this issue in this VMWare Communities thread.
March 03, 2008
So I had to add about 70 user accounts to Active Directory in preparation for a new call center. Sounds like boring, tedious work if you ask me. Well, it would be without the magic of dsadd.exe, a command in Windows 2003 command line that allows you to create Active Directory objects, such as users, computers, groups, contacts, and OUs. My focus here is on adding multiple user accounts.
Focusing on my needs, I wanted to add the user, set the display name, set a password, set a description, set the office, their title and department, and their logon script while forcing a password change and the ability to change the password. I also wanted these accounts to start disabled since it might be a week or two before the users are ready for them. Have the accounts created in the proper OU would also be nice. Also, my users would be logging with accounts based on their phone extension numbers, since high turnover is a concern.
So, I set up a user, called cc70215. Since I want him in his proper OU, I set him up as cn=cc70215,ou=Users,ou=CallCenter,dc=sysadminhell,dc=com. This was no big deal, I already had the list of users, just copy/paste and some text replacement set up the list of users. With all I wanted to do, I set up the command as such:
DSADD user cn=cc70215,ou=Users,ou=CallCenter,dc=sysadminhell,dc=com -display cc70215 -pwd mypassword -office "Call Center" -title "Customer Service Associate" -dept Collections -loscr cc_li.vbs -mustchpwd yes -canchpwd yes -disabled yes
A success message will return if successful and navigating to the CallCenter, Users OU will reveal my new account. But this is a pain to set up 70 times. And it was 30 minutes before time to go home. So, I got dirty a bit and cheated with the batch script FOR command. First, I got all my users in a comma-separated list. I also had to put quotes around each user. A quick text replacement in my favorite text editor (Notepad2) did the trick. Then I created a batch file, and put in the following:
FOR %%D in ("cn=cc70216,ou=Users,ou=CallCenter,dc=sysadminhell,dc=com", "cn=cc70217,ou=Users,ou=CallCenter,dc=sysadminhell,dc=com", "cn=cc70218,ou=Users,ou=CallCenter,dc=sysadminhell,dc=com", "cn=cc70219,ou=Users,ou=CallCenter,dc=sysadminhell,dc=com", "cn=cc70220,ou=Users,ou=CallCenter,dc=sysadminhell,dc=com") DO DSADD user %%D -display %%D -pwd mypassword -office "Call Center" -title "Customer Service Associate" -dept Collections -loscr cc_li.vbs -mustchpwd yes -canchpwd yes -disabled yes
For this example I only used 5 users, but you get the point.
Put a pause and exit in there and run it as a domain admin. With all luck, your accounts will show up in no time. Now, I did find one issue with this method. Here I'm telling it to set the -display (Display Name) with the variable %%D. What this does is set the Display Name for the account as "cn=cc70216,ou=Users,ou=CallCenter,dc=sysadminhell,dc=com", which is not ideal. Since I was under some time constraints, I just changed the Display Name for the new accounts manually (took me about 10 minutes to prep the script, 2 minutes to run it, then another 10 to fix the Display Name issue). Researching other ways to do this now that I have some free time, I could have done this via wscript (using arrays), used the built-in Windows command CSVDE.exe (see this Technet article for more info), or bought one of several different commercial applications. Even with the one flaw, it did all I wanted it to do for free and under 30 minutes.
March 01, 2008
I was setting up an old server to act as a print server today and decided to share a tip or two.
Move your print spools to another disk.
Since spooling can take up a bit of I/O, moving this to a disk other than on your system disk can help speed things up a bit. This also helped me a few years ago when I had a 12 GB system partition (remember when vendors shipped drives like that) and needed to free up some space.
1. Open the Printers and Faxes applet.
2. Click on File and Server Properties.
3. Click the Advanced tab.
4. Change the directory of the Spool Folder to the other drive.
5. Click apply.
6. Restart the Print Spooler. Open a command line and run net stop spooler && net start spooler.
Install only the DRIVERS, not the software.
I've seen people do this before, especially with HP or Dell (Lexmark) printers. When setting up a printer on a server, don't run the printer's "install" utility, don't install their special "printer monitor", and don't run any "driver install packages". Always install only the drivers. This avoids all the unnecessary services and processes running on your server. I've found that most of these programs are bulky, eat memory, and will slow down your printing. I've seen a few from the vendors I mentioned already that have memory leaks.
Beware printers on a terminal server.
Actually, don't beware of them. Just don't put them on the terminal server in the first place. Set up all your printer queues on a different server. There are several reasons for this.
1. Disk I/O is an important resource in Terminal Server. When you have 60+ users hammering the same disk at the same time, you don't need 20 print jobs trying to do the same. If you HAVE to have printer queues on the Terminal Server, follow my first tip and move the spools to another disk.
2. Memory usage is another important resource. The print queues will take up memory, but some drivers will spawn a process for each and every user on the system. This adds up quick if you have two or three of these processes per user and a large number of users.
3. If you have a limited amount of hard drive space, periods where there is a high volume of printing will make things much worse (unless you move the spools to another drive).
4. All of your users will see all of the print queues on the system. This can provide some amount of confusion for your users, and you might find them printing to the wrong printer or changing printer settings.
Printer pools and other tips
I found the article Configure IT Quick: Configure print queue servers for efficient printing informative if it's applicable for your environment.
Also see the article Get IT Done: Boost printer performance by adjusting Windows' spool file settings.